

Bella and Artemis | Frocktails 2019 | A Self-Covered Button
Bella, meet Artemis
And, my, how nicely did they play together! If you follow my blog you may have already read my blog post where I talk about planning my Frocktails outfit. If you would like to read it, please follow this link.
In this post, I talk about the results—my experience working with these patterns, the mods and tweaks I made, and other miscellaneous thoughts as they arise.
But, just to nail my colours to the mast from the outset, I loved this outfit. I truly felt all types of old-world-Hollywood glamour in this combination of the Bella Dress by Make My Lemonade and the Artemis Coat by I AM Patterns. So, without further ado, let’s start with Bella.

Bella Dress
Whoa.
That was my first thought when I saw versions of this dress pop up in my Instagram feed, and Bella did not disappoint as a pattern. Bella is one of those smashed for six, over the boundary and out of the grounds kinda designs. With its dramatic sleeves and beautiful shaping from the waist ties, this is a high-impact design that is surprisingly effortless to wear.


Where, as you’ll find further down, it wasn’t really necessary to toile the Artemis Coat, if you’re investing in some expensive fabric for a special event, Bella is worth the time it takes to make a wearable toile for two key reasons: the ease and the neckline. (Just a note, I totally think that a wearable toile would be just fine for this dress.)
Bella is very generously sized, and I think that you could tweak the drama depending on how much ease you want in your dress. My measurements put me between a 42 and a 44 and I made a size 44. And although I am now more like a size 40, the look of the dress hasn’t suffered for the extra ease I now have wearing it. If you are worried about the ease, I would say it is worth the time doing a wearable toile because there is not a lot in the instructions by way of finished garment measurements or, indeed, measurements in general, not even the height of person the pattern is drafted for. (You can see photos of my wearable toile in my previous post.)


As drafted, the neckline is very plunging on me, as in it finished below my bra-line, so if you are on the shorter end of the spectrum this might be something you want to watch. It’s an easy-enough fix, though. At first I was going to futz about redrafting the neckline, but I ended up just following the line of the stitching further up to have the V-neck opening at a more modest position. There is probably a neater way to do this but as I was a bit rushed this worked fine.

Ordinarily I am wholeheartedly Team Pockets, but I think this dress is the exception for that. The pattern has two welt pockets, which I included in my toile and then left out of the final version. Because of the way the waist ties wrap the dress, my pockets ended up in weird places—like one was sort of over the crotch :-/—so, meh. My thought is leave them out. However, this is the benefit of your wearable toile. Maybe you can make them work for you? Test it out and see for yourself.


And a final note on the pattern is this: consider the hem line. It’s drafted to sit level when the waist ties are undone, but when you tie the waist the back gets pulled up and the front sits much lower. Like a front mullet. You can see this very clearly in the pictures of my toile. For my Frocktails version, I cut a sort of gently-curved wedge that removed 5” at the centre front of the dress, tapering out to nothing at the sides. This largely fixed the front-mullet, but I kind of love the idea of a mid-calf length version of this dress. So, I would recommend considering lengthening the back if you’re wanting a longer dress—something to play with on your wearable toile, no?


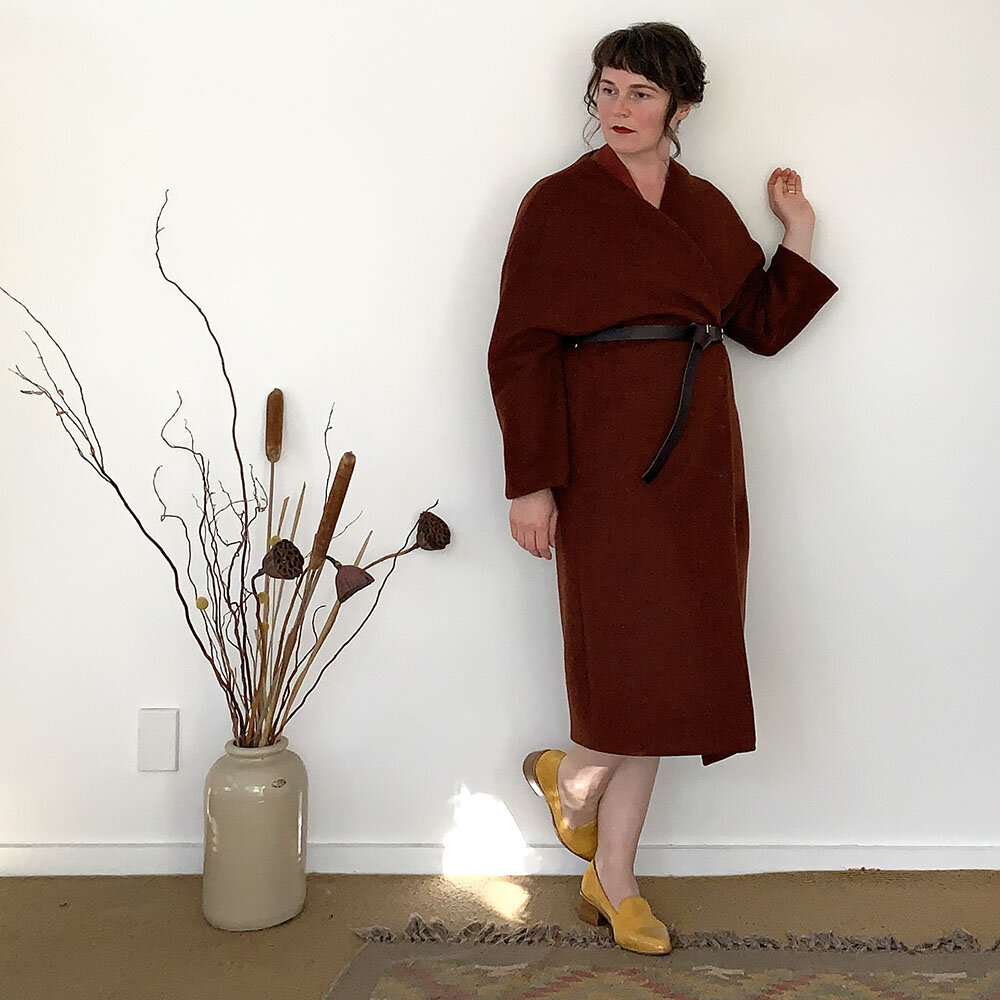
I teamed Bella with a sumptuous bricky-red satin twill purchased from The Fabric Store. It’s shifty, misbehaving, curse-inducing, even, but hot-damn I reckon it was worth the struggle. I love the colour, the luster, and the swishy movement.
I’d call the pattern instructions and the related how-to video … idiosyncratic. But charmingly so! Sometimes the video doesn’t marry up with the instructions as written, and sometimes the written instructions are difficult to follow. However, between the video and the booklet, there’s enough information there for a sewist with a bit of experience.

And, honestly, the instructions could be a lot worse and I would still totally, utterly, unequivocally think that the effort of figuring them out was worth the results. The double-neckline created by the wrap waist is glorious, the sleeves are joyously extravagant, the back neckline is oh-so elegant. Wearing this dress I felt effortlessly glamorous, oozing understated drama, modest and a little sexy. All this at once, you ask? Yes, dear reader, yes. It is my unicorn dress.

Artemis Coat

When I was looking through my saved posts on Instagram there was a consistent theme that took me a little while to notice: the Artemis Coat by I Am Patterns. And I think that it took me a minute to notice it was the same coat time and time again speaks to the versatility of this design: it generously lends itself to being styled and modified in so many different ways, making each version very individual to the wearer.

My original plan was to make a long version (using this tutorial) and to line it (using this tutorial). I would make it from some heavy-weight wool coating I bought and stashed from Blackbird Fabrics, teamed with some Liberty Silk Satin as the lining (from The Fabric Store). Some lovely large, brown corozo buttons from Miss Maude would finish it nicely. There. Simple enough.


Which was about when the mods and possibilities for details started creeping in. After virtually finishing the coat, up to and including a belt and belt carriers made from the same fabric, I decided that the shawl collar combined with the long-version length and the self-fabric belt looked far too much like a dressing gown on me, so out came the trusty quick-unpick to remove it all, returning me to a much more stream-lined version. I think the shawl collar is gorgeous and I’d love to try it on a short version, but it just wasn’t working for this version.


However, I hadn’t entirely given up on including some form of belt to cinch in the waist, and it was when playing with my husband’s heavy-duty leather belt that I had an inkling of how to add it. And so the coat finishing went into overdrive.


Miss Maude has a fabulous selection of fastenings and finishings for bag making, including split-hide leather straps and buckles galore. I figured a double D belt, using her thickest leather strap would do the job nicely. For the belt carriers, I used a leather strapping that was half the width of the belt, with a carrier at each of the side seams and two carriers, either side of the centre-back seam for a little bit of extra detailing. These were all secured with double-headed rivets. With the remaining leather I made a cool-looking cuff, which you can see in the dress photos above.


And hot-damn, am I happy with how those mods and details worked out! I also added an extra button closer to the side-seam of the coat, so I can wrap the coat firmly around me, anchor it at the side seam button, and then cinch it in with the belt.


And the verdict? I think Artemis is a great pattern. It’s very simple to put together and would be absolutely appropriate for a first-coat project. I took the time to toile it, but given how few pattern pieces there are, how much ease there is and how easy it is to adjust the fit, I don’t really think a toile is necessary. There are useful tutorials for making it in different lengths and for lining it, and it is a really fun canvas for all sorts of modifications and details, as I found.


However, I haven’t fallen unequivocally in love with my version. I love how it worked out for my Frocktails outfit! I felt like it was pitched perfectly to work with my dress. But I haven’t been grabbing for it since. After a lot of reflection I think I know why: what I especially loved about the work-in-progress photos was its simplicity sans lining.


The lining I chose for it is so extra, so wild, so fabulous, it’s difficult to work in with other outfits. So, I’ve decided I’m going to re-fashion it before next winter, using a lining that is more easy to work into my everyday wardrobe. I stand by contrasting linings for coats, but in this case, I think it was too much. This has been a very good lesson for me. The Liberty will find a good home, (I’m already thinking a Scout Tee and a matching headscarf) but its forever-home is not with this coat.

The Final Flourish!

Dear reader, you may have guessed already that my plans for a velvet shawl did not come to fruition. Time was against me! So instead I opted to commission a comb with dried flowers from Floraide Boutique Florist in Miramar, Wellington. Annwyn’s shop is a treasure trove of fresh and dried botanical glories and I’d highly encourage Wellington-based people to pay her a visit! Annwyn nailed what I was wanting from the comb, perfectly finishing my Frocktails outfit. I got my ‘do done by my hairdresser, Chinami at The Powder Room on Cuba Street, and Chinami, too, nailed the loose French twist I was after. It was very special being able to invest a little in getting my hair done and this comb made.

Finally, Frocktails Wellington was a blast! It was ram-packed with sewists from all over the place and I was delighted to meet some new people who have since become friends, catch up with people I haven’t seen in a while, and hang out with my most excellent sewing friends. Much prosecco was had by all (me. I mean me. I had lots of prosecco.) after which I extracted the 384-or-so hair pins before falling into a contented slumber.
Thanks for reading along about my Frocktails outfit! Needless to say I’m already looking forward to next year.


